iPhone Note #6: Presenting a DatePicker as a ViewController Modally
Part 1: Creating your own control inside a view controller..
-
File -> New. Choose UIViewController subclass. Tick the checkbox “With XIB for user interface”. Save it as “DatePickerViewController”.
-
Open the DatePickerViewController.xib from IB.
-
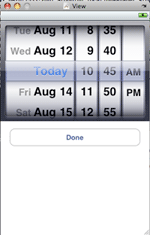
In IB, drag a UIDatePicker and a UIButton as shown below.

- In DatePickerViewController.h,
#import @protocol DatePickerViewControllerDelegate; @interface DatePickerViewController : UIViewController { IBOutlet UIDatePicker *datePicker; id delegate; } @property (retain) IBOutlet UIDatePicker *datePicker; @property (assign) id delegate; - (id)initWithNibName:(NSString *)nibNameOrNil bundle:(NSBundle *)nibBundleOrNil; - (IBAction)doneButtonPressed:(id)sender; @end @protocol DatePickerViewControllerDelegate @optional -(void)datePickerViewController:(DatePickerViewController *)controller didChooseDate:(NSString *)chosenDate; @end |
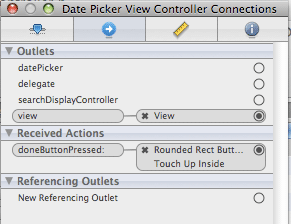
- Now, lets hook up the “doneButtonPressed” in IB. In IB -> Tools -> Connections Inspector. Drag the touch “Touch Up Inside” event to the File’s Owner which is DatePickerViewController. Choose the method “doneButtonPressed:” when it shows up.

- Next, implement the doneButtonPressed
#import "DatePickerViewController.h" @implementation DatePickerViewController @synthesize datePicker, delegate; - (id)initWithNibName:(NSString *)nibNameOrNil bundle:(NSBundle *)nibBundleOrNil { if (self = [super initWithNibName:nibNameOrNil bundle:nibBundleOrNil]) { // Custom initialization self.title = @"Date Picker"; } return self; } //-(void)datePickerViewController:(DatePickerViewController *)controller didChooseDate:(NSString *)chosenDate; - (IBAction)doneButtonPressed:(id)sender { if ([self.delegate respondsToSelector:@selector(datePickerViewController:didChooseDate:)]) { NSDateFormatter *dateFormatter = [[[NSDateFormatter alloc] init] autorelease]; [dateFormatter setDateStyle:NSDateFormatterMediumStyle]; NSString *dateString = [dateFormatter stringFromDate:[datePicker date]]; [self.delegate datePickerViewController:self didChooseDate:dateString]; } } - (void)dealloc { [datePicker release]; [super dealloc]; } @end |
Part 2: Displaying the view controller modally
-
From this point on, I will refer to JobProfileViewController as the client. The client will create and present the DatePickerViewController modally (which is now referred to as picker). Once the user is finished using the picker and hits the “Done” button, the client will dismiss the picker and process the returned results.
-
Make the client conform to the DatePickerViewControllerDelegate.
#import "DatePickerViewController.h" @interface JobProfileViewController : UIViewController { |
- Trigger an event to create and present the picker modally. In my case, its a button which is hooked up to showDatePicker method. Now, make the client as the delegate for the picker. Present the content modally then release the object.
JobProfileViewController.h:
- (IBAction)showDatePicker{ DatePickerViewController *datePickerViewController = [[DatePickerViewController alloc] initWithNibName:@"DatePickerViewController" bundle:nil]; datePickerViewController.delegate = self; [self presentModalViewController:datePickerViewController animated:YES]; [datePickerViewController release]; } |
- Since the client is now the delegate for the picker, we can implement “didChooseDate” method inside the client. It is good practice that whoever (in our case the client) presents the content modally should also dismiss the content. Process what needs to be done, then let’s dismiss the modal content. Note: There is only one modal content for every view controller.
JobProfileViewController.h:
-(void)datePickerViewController:(DatePickerViewController *)controller didChooseDate:(NSString *)chosenDate{ NSLog(@"Chosen Date as String: %@", chosenDate ); job.startDate = chosenDate; [startDate setTitle: chosenDate forState: UIControlStateNormal]; [self dismissModalViewControllerAnimated:YES]; } |
UPDATE OCT 2, 2009: Download DatePickerModalExample.zip