Real time mobile GPS tracking using android, node.js, socket.io and postgres
UPDATE: Mar 3
Updated apk, github repos and instructions
TLDR; For the impatient…
-
Download and install itrackmygps.com on your android device.
-
Register.
-
Enable GPS on your device. Let’s rock! Walk, run, drive with your android device. Be careful!
-
Share your location via SMS or provide this link: http://itrackmygps.com/access?u=[your_username] to your viewers.
-
Alternatively, you can login and see the map from http://itrackmygps.com/current and watch live gps updates from your device.
This post is about my experiments on how to display real time gps updates from a mobile client to a web browser. All the source code for this post is hosted on my github.
https://github.com/rdeguzman/itrackmygps-android
https://github.com/rdeguzman/itrackmygps-node
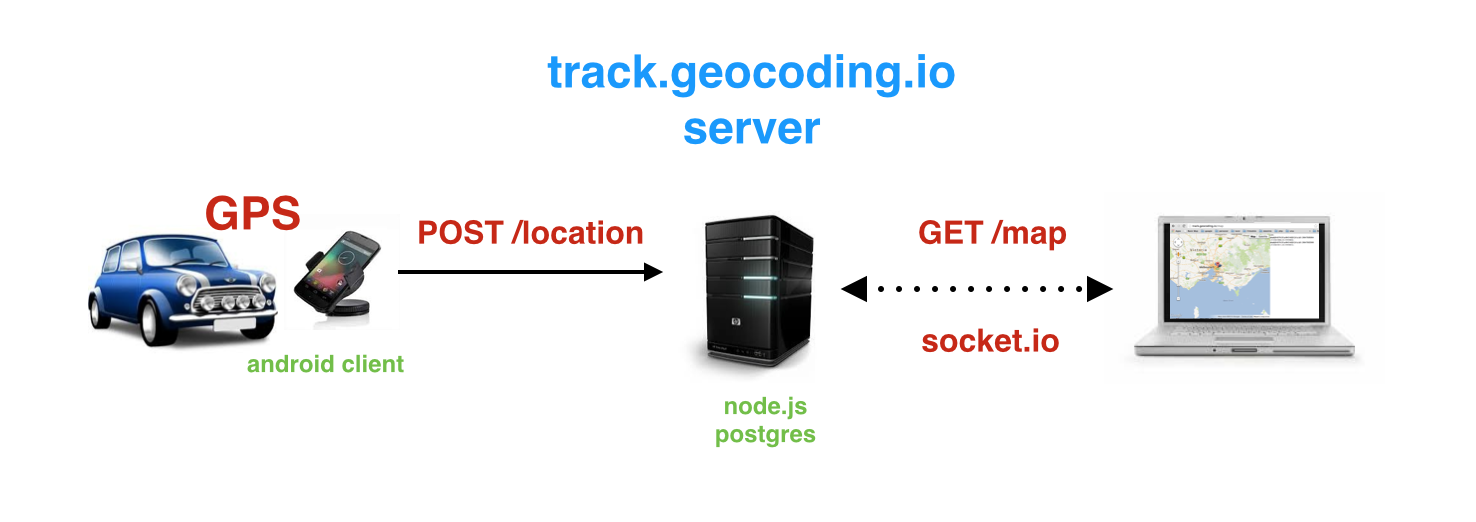
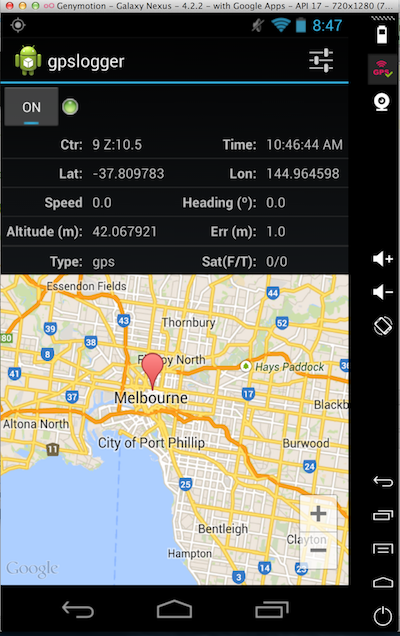
Android Client
In a nutshell, an android background service listens for location (network and gps) updates. It saves the gps location details (lon/lat, speed, heading and timestamp) on a local sqlite database. Afterwards, it then posts it to a remote server via Volley (an http library for android).
I spruced it up a little bit by adding Google Map for Android v2 on the main activity. Thus, you will definitely need your own Google Map key to run the android client.
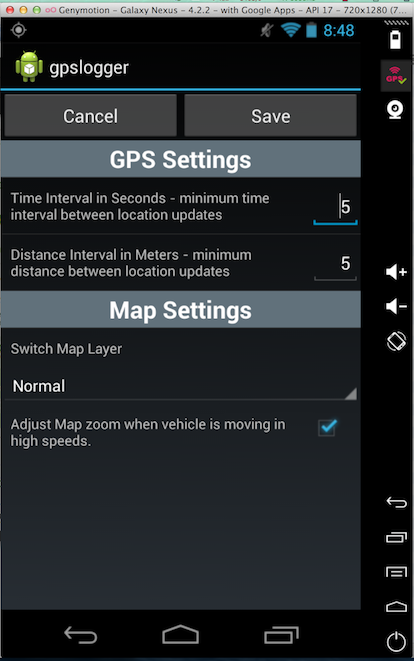
As not to drain the battery, a SettingsActivity provides basic configuration and control for time and distance interval.
Server backend
The backend is mainly nodejs using socket.io and saves the gps details thru Postgres.
- The nodejs
server.jsbackend opens an http (8080) connection. We define a basic routing setup below. It has aGET "/map"route which deliversmap.htmlto the web client.
var route = { routes : {}, for: function(method, path, handler){ this.routes[method + path] = handler; } } route.for("GET", "/map", function(request, response){ fs.readFile('./map.html', function(error, data){ response.writeHead(200, {"Content-Type": "text/html"}); response.end(data, 'utf-8'); }) }); function onRequest(request, response){ var pathname = url.parse(request.url).pathname; console.log(request.method + " request for " + pathname); if(typeof(route.routes[request.method + pathname]) === 'function'){ route.routes[request.method + pathname](request, response); } else{ response.writeHead(404, {"Content-Type": "text/plain"}); response.end("404 not found"); } } var server = http.createServer(onRequest); server.listen(port); console.log("Server " + port + " has started."); |
- The
POST "/location"route will process all incoming location updates from our mobile clients (currently android, but iOS soon!).
route.for("POST", "/location", function(request, response){ var form_data = ""; request.on('data', function(chunk){ form_data += chunk.toString(); }) request.on('end', function(){ console.log(form_data); insertLocation(obj); var obj = qs.parse(form_data); insertLocation(obj); response.writeHead(200, {"Content-Type": "text/plain"}); response.write("OK"); response.end(); }) }); |
- The function
insertLocation(obj)saves the gps details in Postgres is pretty straightforward.
function insertLocation(loc){ pg.connect(connectionString, function(err, client, done) { if(err) { console.error('error fetching client from pool ', err); } else{ var sqlStmt = "INSERT INTO locations("; sqlStmt += "device_id,"; sqlStmt += "gps_timestamp,"; sqlStmt += "gps_latitude,"; sqlStmt += "gps_longitude,"; sqlStmt += "gps_speed,"; sqlStmt += "gps_heading,"; sqlStmt += "created_at)"; sqlStmt += "VALUES ($1, $2, $3, $4, $5, $6, Now())"; var sqlParams = [loc.device_id, loc.gps_timestamp, loc.gps_latitude, loc.gps_longitude, loc.gps_speed, loc.gps_heading]; var query = client.query(sqlStmt, sqlParams, function(err, result){ if(err){ console.error('error inserting ', err); } else{ console.log(result); } }); done(); } }); } |
- We now open a socket.io object and listen thru the http server on port 8080. Each time a browser is connected, its socket instance is pushed to an array, in this case the
map_clientsobject.
var server = http.createServer(onRequest); server.listen(port); console.log("Server " + port + " has started."); io = io.listen(server); io.sockets.on("connection", function(client){ // We push the map clients to an array. // If a gps is received from a device, // we broadcast the gps to all map clients. console.log("Map client connected"); map_clients.push(client); client.on('disconnect', function(){ map_clients.splice(map_clients.indexOf(client), 1); }) }); |
- We modify our
POST "/location"route and using themap_clientsobject, we loop over ALL connected sockets/map_clients, and send the incoming gps location update.
route.for("POST", "/location", function(request, response){ var form_data = ""; request.on('data', function(chunk){ form_data += chunk.toString(); }) request.on('end', function(){ console.log(form_data); var obj = qs.parse(form_data); insertLocation(obj); console.log("Connected clients: " + map_clients.length); for(var i=; i < map_clients.length; i++){ var client = map_clients[i]; var jsonString = JSON.stringify({ type:'gps', data:obj}); client.send(jsonString); } response.writeHead(200, {"Content-Type": "text/plain"}); response.write("OK"); response.end(); }) }); |
Web client (viewer)
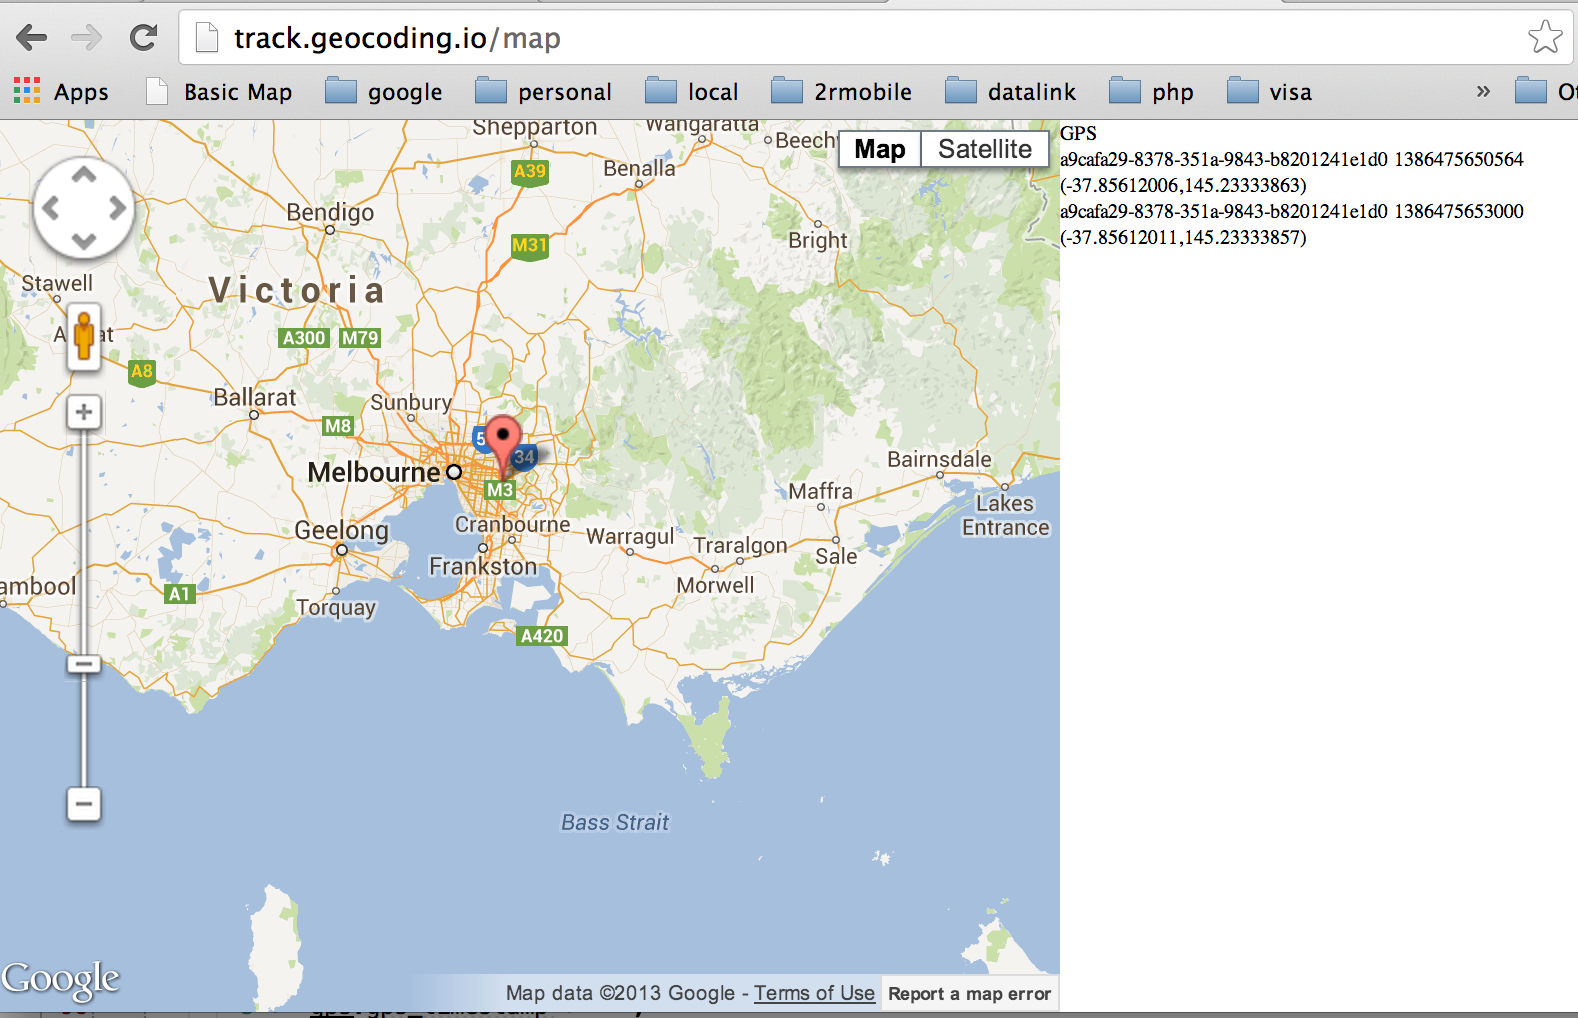
The web client displays a google map and sets its lonlat initially to 0,0. So don’t be surprised if you only see a blue ocean. Once a device sends a gps update, the map will automatically zoom to its position.
- When a web client points its URL to http://track.geocoding.io/map, the browser connects to the remote server on port 8080 using socket.io. It now listens for incoming messages from the server backend and pass the gps data to the
processGPS()function.
function initSocket(){ var socket_host = "track.geocoding.io"; var socket_port = 8080; socket = io.connect('http://' + socket_host + ':' + socket_port); socket.on('message', function(d){ var parsedObj = JSON.parse(d); if(parsedObj.type === 'gps'){ var gps = parsedObj.data; $('#messages').append(formatGPSHTMLOutput(gps)); processGPS(gps); } }); } |
- As the function
processGPS()name implies, it process the location update coming from the server backend. Each google.map.marker is a particular device. To distinguish a gps update for a particular device, we usegps.device_idand search for thedevice_idelement in thedevicesarray.
function processGPS(gps){ var device = getDevice(gps.device_id, devices); if(device == null){ device = createDevice(gps); devices.push(device); } else{ moveDevice(device, gps); } } function getDevice(device_id, markers){ var device = null; for(var i = ; i < markers.length; i++){ if(markers[i].device_id === device_id){ device = markers[i]; break; } } return device; } |
- Once we know which device marker we need, base on the gps.device_id, it is simply a case of displaying the marker on the map. If the device marker does not exist yet, we call
createMarker(). If the device marker already exist, then we move the particular marker based on its new position (lonlat), seemoveMarker()
var map, devices_bounds, socket; var devices = []; function initMap(){ //var myLatlng = new google.maps.LatLng(-25.363882,131.044922); //Australia var myLatlng = new google.maps.LatLng(,); var mapOptions = { center: myLatlng, zoom: 10 }; map = new google.maps.Map(document.getElementById('mapdiv'), mapOptions); devices_bounds = new google.maps.LatLngBounds(); } function createDevice(gps){ var pos = getLatLngFromString(gps); var marker = new google.maps.Marker({ position: pos, map: map }); marker.set("device_id", gps.device_id); adjustMapBounds(pos); return marker; } function moveDevice(device, gps){ var pos = getLatLngFromString(gps); device.setPosition(pos); adjustMapBounds(pos); } function getLatLngFromString(obj){ var lat = parseFloat(obj.gps_latitude), lon = parseFloat(obj.gps_longitude); return new google.maps.LatLng(lat, lon); } |
We add some google map smarties such as rendering all available markers/devices on the map.
function adjustMapBounds(pos){ if(map.getBounds().contains(pos) == false){ devices_bounds.extend(pos); map.fitBounds(devices_bounds); } } |
As the device sends location updates you can see the actual marker move on the web client’s map! If we have multiple viewers, each of those viewers will receive location updates as well in realtime.
Hope you enjoy this post!