iPhone Note #19: Route-Me: Opensource mapping for the iphone
Route-Me is an opensource mapping api similar to the MapKit.framework. The main project resides in googlecode (http://code.google.com/p/route-me/).
Part 1: Making the Sample Apps work.
-
Download the code from svn.
svn co http://route-me.googlecode.com/svn/trunk/ route-me -
In the route-me directory, you would have 3 directories:
– MapView – this contains the mapping framework
– Proj4 – projection library.
– samples -
Build MapView. I encountered some problems here, particularly this specific issue: Cannot build on 3.1 using iphone simulator.
How to make the build? Now, at the time of this writing, I have XCode3.1.4 and iPhone 3.0, 3.1, 3.1.2. Edit the project settings so that the “build” and “release” will point to use 3.0. If you encounter a problem, it is best to “Clean All”, remove the build directory, then “Build” again. To verfiy if you have a successful build, notice that libMapView.a was created.
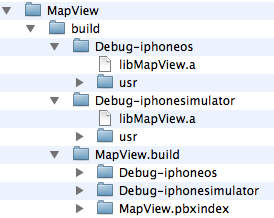
Note: Notice here that I have libMapView.a both in Debug-iphoneos/ and Debug-iphonesimulator/
No need to build Proj4 as long as it is sitting on the same directory where MapView is.
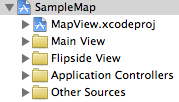
- To test route-me, we can study from the samples directory. Let’s build samples/SampleMap. Notice that SampleMap has a reference to MapView.xcodeproj.
Similarly, we can build this using 3.0 both in the simulator and device.
Part 2: Integrating with your own project.
Reference: http://code.google.com/p/route-me/wiki/EmbeddingGuide
-
Create a view-based project: MyRMSampleMap.
-
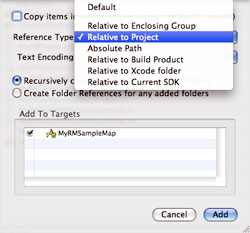
Project -> “Add To Project”. Make the reference type as “Relative to Project”.
- Configure your project to have a direct dependency with MapView.xcodeproj. Follow the instructions exactly as stated from the EmbeddingGuide.
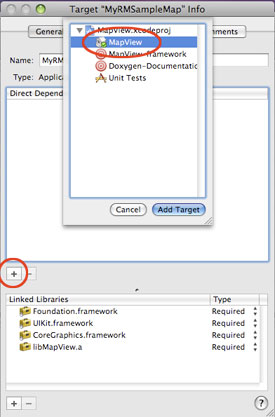
Click on the “Build” tab in your target’s info window.
Change the Configuration popup to read “All Configurations”, so that your changes can be made just once.
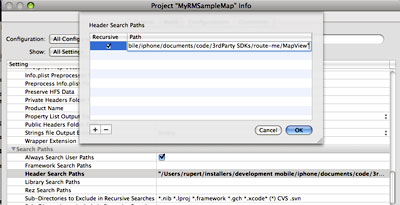
Find “Header Search Paths” under “Search Paths” (shortcut: type “header” in the search box at upper right of the target info window). Double-click on the ‘Header Search Paths’ text and add the path to the MapView directory contained in the route-me project located on your file system. (Note that if there are any spaces in the path, enclose the entire entry with “”. If the MapView project folder is placed next to your project’s project folder on the file system, you would have the following in the path: “../MapView”.
Check the ‘Recursive’ box and click Ok.
-
Make a test “Build”.
-
Add a reference to:
– QuartzCore.framework
– libsqlite3.dylib -
Let’s add our mapview in the interface: MyRMSampleMapViewController.h
#import <UIKit/UIKit.h> #import "RMMapView.h" @interface MyRMSampleMapViewController : UIViewController { RMMapView *mapview; } @property(nonatomic, retain) RMMapView *mapview; @end |
- In the implementation, add this snippet.
@synthesize mapview; ... - (void)viewWillAppear:(BOOL)animated{ mapview = [[RMMapView alloc] initWithFrame:CGRectMake(0.0f, 0.0f, 320.0f, 460.0f)]; [mapview setBackgroundColor:[UIColor blackColor]]; [self.view addSubview:mapview]; } |
Download: MyRMSampleMap.zip