Migrating Postgres / Postgis Tables to Oracle Spatial
**
Step 1: Installing and configuring
</strong>
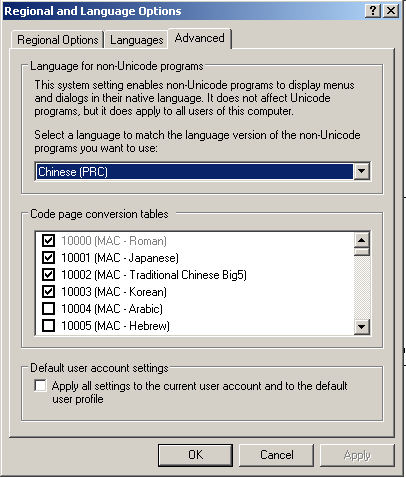
- On Windows, make sure that Windows > Settings > Control Panel > Regional Settings
– Chinese (PRC)
- Install Oracle10g
– make sure you have spatial installed
SQL> SELECT COMP_NAME, STATUS FROM DBA_REGISTRY WHERE COMP_NAME = 'Spatial'; |
-
Create a multilingual database using dbca. Make sure setting is set to UTF8. I installed the sample schema for learning purposes. Read this previous post for more information.
-
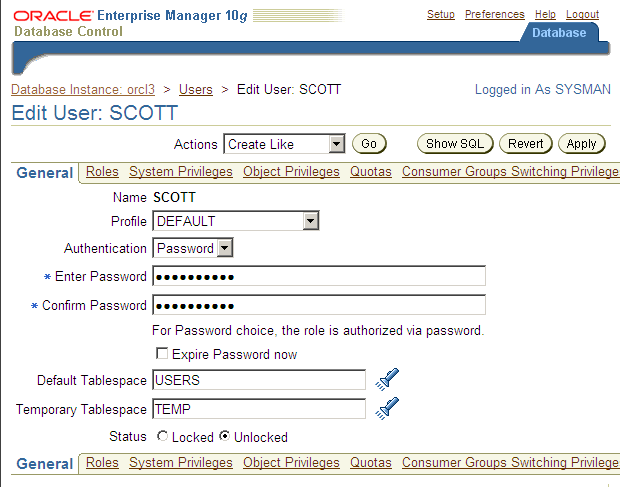
We can add a user for our spatial database or just enable scott/tiger from the Enterprise Manager.
On Administration > Users > “Search for SCOTT” > Hit EDIT > UNLOCK the status.
**
Step 2: Get Oracle Client Tools
</strong>
- On the same WindowsXPSP3 machine that I installed Oracle. There is already SQLPlus. However I always go for the native which is CLI based. So on a command prompt, sqlplus still works. Also note that I can toggle to my previous commands using *“Arrow Up”. If we have the Oracle Database installed on a different machine, we need to download the ff:
- Oracle SQL Developer (Java GUI-Based)
http://www.oracle.com/technology/software/products/sql/index.html
-
Oracle 10g Client for Windows (10201_client_win32 1.zip 453MB)
-
Oracle 10g Client for MacOS (Oracle_10204Client_MAC_X86.zip 189MB) – rarely used.
-
Oracle Instant Client for MacOS (instantclient-basic-macosx-10.2.0.4.0.zip 32MB) – need to try this.
**
Step 3: Creating the Table
</strong>
- POI Table
CREATE TABLE poi ( poi_id NUMBER(10), cn_name varchar2(255), py_name varchar2(255), en_name varchar2(255), en_visname varchar2(255), cn_fullpoiadd varchar2(255), en_fullpoiadd varchar2(255), py_fullpoiadd varchar2(255), cn_rdname varchar2(255), py_rdname varchar2(255), cn_address_no varchar2(255), py_address_no varchar2(255), cn_address_other varchar2(255), py_address_other varchar2(255), postal varchar2(20), tel_no varchar2(255), fax_no varchar2(255), email varchar2(255), web_url varchar2(255), operating_hours varchar2(4000), cards_accepted varchar2(4000), cust_capacity varchar2(4000), park_space varchar2(4000), longitude NUMBER(20,8), latitude NUMBER(20,8), CONSTRAINT "poi_pkey" PRIMARY KEY (poi_id) ); |
**
Step 4: Exporting to TextFile with “|”
</strong>
Export the table into a textfile. Run the SQL statement below on Navicat. Afterwards, run the “Export Wizard” and specify “|” as the delimiter.
SELECT poi_id, cn_name, py_name, en_name, en_visname, cn_fullpoiadd, en_fullpoiadd, py_fullpoiadd, cn_rdname, py_rdname, cn_address_no, py_address_no, cn_address_other, py_address_other, postal, tel_no, fax_no, email, web_url, operating_hours, cards_accepted, cust_capacity, park_space, longitude, latitude FROM poi |
Find out how many lines were exported using “wc -l file-name”. If there are more lines than actual records then most likely there are ‘\n’ (newlines / carriage returns) on the exported file.
**
Step 5: Use SQLLOADER to bulkload the data
</strong>
SQLLDR scott/tiger CONTROL=poi_full.ctl DATA=data_navicat_cn_all2.dat
Since we have point data in longitude, latitude columns. It is very easy to populate the SDO_GEOMETRY with these columns.
**
Step 6: Creating Point Geometries from Long/Lat Columns
</strong>
CREATE TABLE poi_app AS SELECT * FROM poi WHERE latitude > AND longitude > ; ALTER TABLE poi_app ADD the_geom SDO_GEOMETRY; UPDATE poi_app SET the_geom = SDO_GEOMETRY( 2001, NULL, SDO_POINT_TYPE(longitude, latitude, NULL), NULL, NULL); INSERT INTO USER_SDO_GEOM_METADATA VALUES ( 'poi_app', -- TABLE_NAME 'the_geom', -- COLUMN_NAME SDO_DIM_ARRAY -- DIMINFO attribute for storing dimension bounds, tolerance ( SDO_DIM_ELEMENT ( 'LONGITUDE', -- DIMENSION NAME for first dimension -180, -- SDO_LB for the dimension 180, -- SDO_UB for the dimension 0.5 -- Tolerance of 0.5 meters ), SDO_DIM_ELEMENT ( 'LATITUDE', -- DIMENSION NAME for second dimension -90, -- SDO_LB for the dimension 90, -- SDO_UB for the dimension 0.5 -- Tolerance of 0.5 meters ) ), 4326 -- SRID value for specifying a geodetic coordinate system ); CREATE INDEX idx_poi_app_the_geom ON poi_app(the_geom) INDEXTYPE IS MDSYS.SPATIAL_INDEX; |
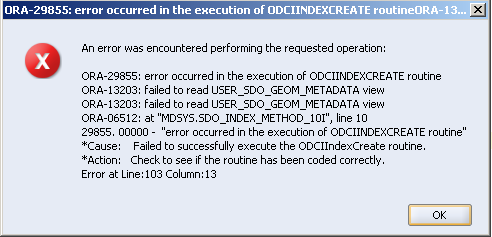
Once the index is created, Oracle creates a SEQUENCE(MDRS_C796$) and a TABLE(MDRT_C796$). Please do not delete this table. I accidentally deleted this table and I have to recreate the indexes–well it was not that easy. I have to DROP INDEX, insert it into USER_SDO_GEOM_METADATA, then CREATE INDEX.
Note that it is important to include the geometry to be indexed in the USER_SDO_GEOM_METADATA table. This should happen before creating the index or receive an error like…
**
Step 7: Creating Geometries from ESRI Shapefiles
</strong>
- PGSQL2SHP – Use this to convert from a postgres table to an ESRI Shapefile. Note that if you have mixed geometries in a single column, then you need output different shapefiles for each geometry. For example, I have a “geo_entities” table which contains polygons, multipolygons, and multilinestrings. I was able to come up with three (3) different shapefiles for each geometry. Then afterwards load the individual shapefiles using SDO2SHP below.
pgsql2shp -f geo_entities_2006 -h 127.0.0.1 -u lbs -P ******* -g the_geom beijing_app "SELECT gid,cn_name,py_name,en_name,entity_type,geom_type,meta_name,cn_district,the_geom FROM geo_entities WHERE GeometryType(the_geom) = 'MULTILINESTRING'" |
- Ensure that you download SDO2SHP
shp2sdo shp\geo_entities_2007 geo_entities_2007 -g the_geom -x (-180,180) -y (-90,90) -s 4326 -t 0.5 -v |
The output of SHP2SDO are three (3) files:
a. CTL – control file containing “LOAD DATA…”
b. SQL – contains “CREATE TABLE…”
c. DAT – Data with “#”